

We are excited to release a new set of features in FireMon Cloud Defense that will dramatically reduce the amount of time it takes to investigate and (potentially) resolve cloud security incidents. Cloud Defense includes two key capabilities to empower cloud incident responders:
- Cloud Defense tracks activity and configuration changes in real-time.
- All misconfigurations are tied to the API calls that created them
We realized we could better-combine these capabilities and the information we already collect to reduce the work required for an incident responder/SOC analyst to analyze and ideally resolve an incident. These are capabilities you might otherwise script into a playbook or SOAR, but Cloud Defense offers the information all in one place (and it’s available via API if you want to integrate with your existing SOAR or other tooling).
When you open up a finding, you now get the following information pre-loaded for you. All of it is either in the main display or available within one click:
- The finding details
- The current configuration of the resource
- Related resources (e.g. for an AMI it will show the associated snapshot and originating instance)
- Who made the change triggering the misconfiguration or event
- The history of findings of that resource (other misconfigurations and the history of pass/fail for all checks)
- All API calls made from the IP address that triggered the finding
- All API calls made from the IAM identity that triggered the finding
- All API calls made with that resource specified
- The full change history for the resource:
- Change history of the resource
- Changes highlighted
- The API call that triggered the change
- The identity of who made the API call
- The permissions of the calling identity
- Any IAM permissions assigned to the resource
- The ability to pivot on any event (API call), identity, or resource
Let’s see what it looks like. Here’s the default view for a new finding. In this case it’s a public EC2 snapshot:
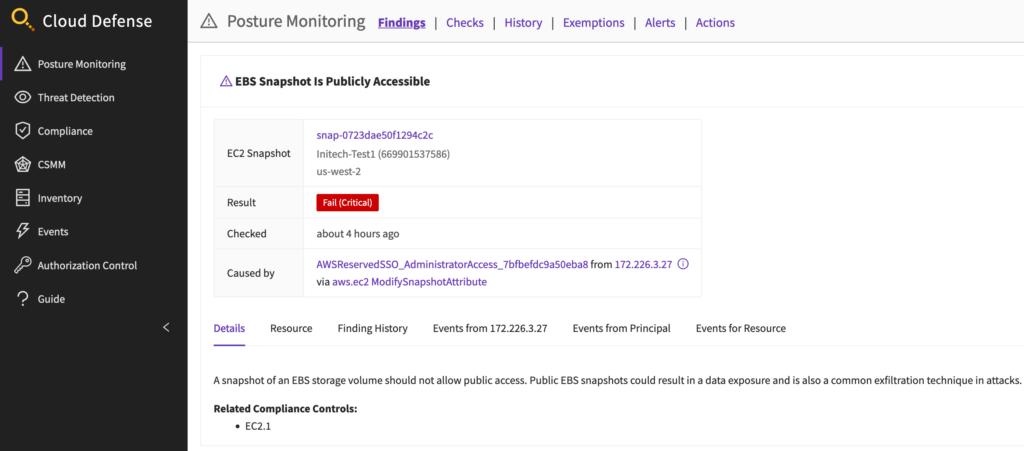
The resource is public, so that’s bad. And right there I can see the IAM principal that caused the finding (since the change is associated directly with the API call that initiated it). One of the first things I can do is drop into the resource tab and trace back to know what Instance/storage volume the snapshot originated from. Then I want to know everything else that IAM principal did:
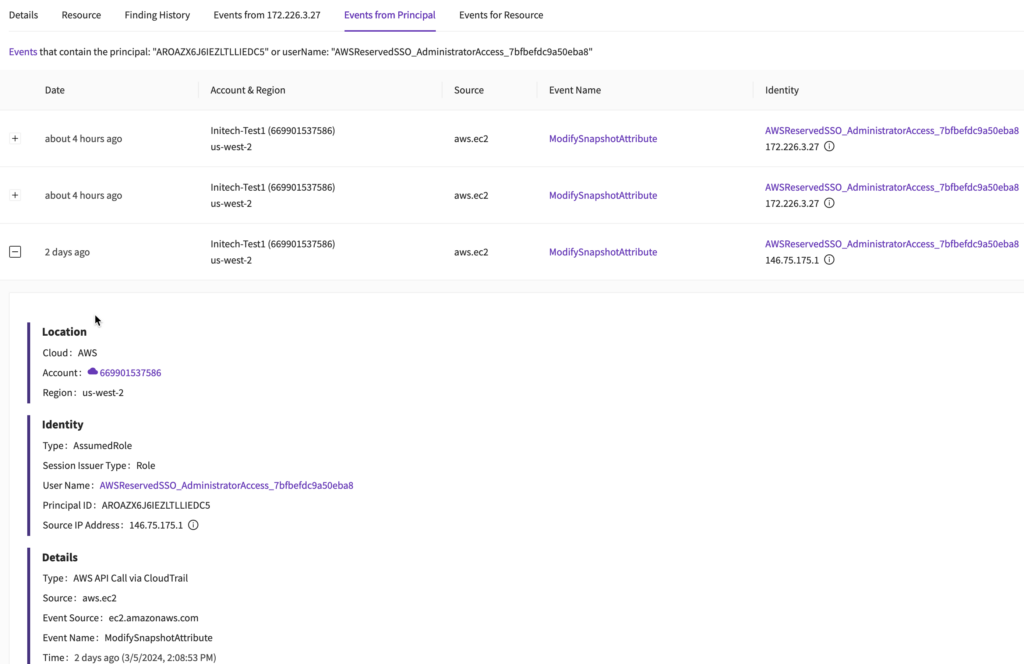
That’s every call made by that IAM principal based on both the name and the AWS Access Key used. With one click you can see the API call, and the IP addresses are prominent so you can look for an attacker pivoting or differentiate between internal and external traffic. In this case it seems like someone with an admin role (based on the name for now, we will validate in a moment) keeps changing snapshot attributes and isn’t doing much else. The screenshot cuts off a bit there but does include the ENTIRE API call.
Well, any role with “admin” role is concerning, so let’s look at the permissions. Clicking on the Identity pulls up that role in the Cloud Defense Inventory:
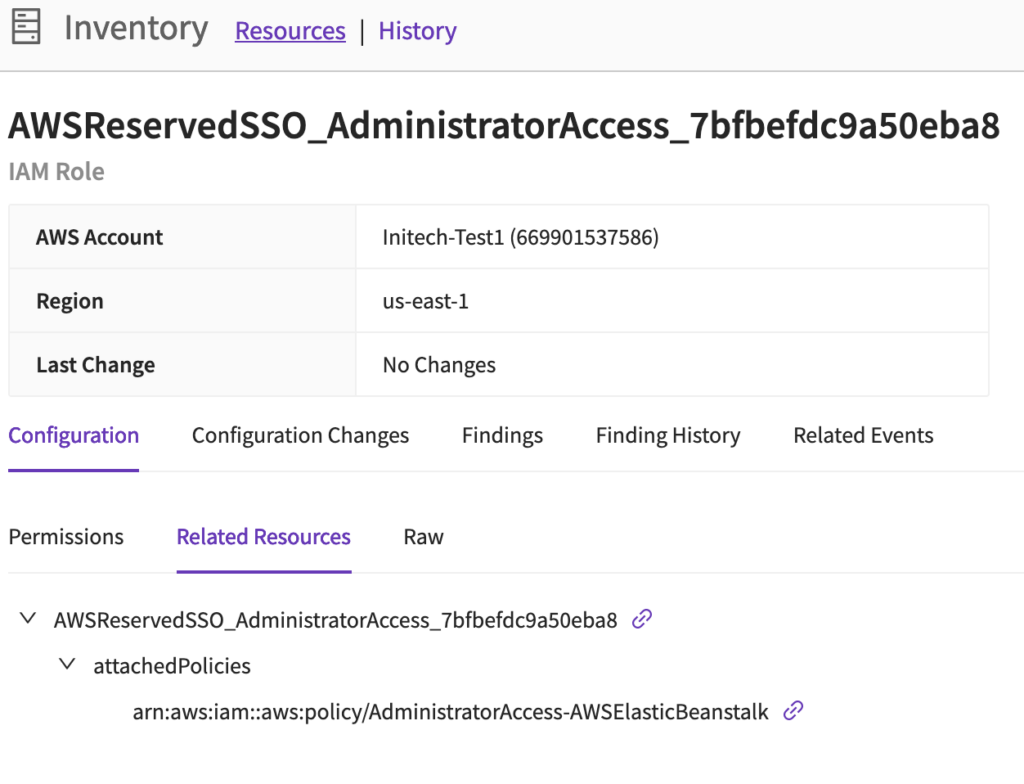
In this case it looks like an Elastic Beanstalk administrator. This post is getting long so we will skip clicking into permissions, but it turns out that policy has very wide EC2 permissions, including taking snapshots.
Depending on the SSO integration we may even be able to identify the user that logged in and assumed the role:

We skipped some steps to keep this post from being too long, but from the finding we know:
- Who made the misconfiguration, including their IP address
- What API call created the misconfiguration
- The IP address of that API call (in this case, likely a known location)
- The permissions of the identity that initiated the incident (partial admin)
- The current state of the resource (public)
- What the snapshot originated from
- Everything else that identity did (just more snapshots)
- Other activity from that IP address (still just the snapshots, no signs of compromising other identities)
As an investigator this appears to be the misuse of an IAM role. My next step is to contain the damage by making the snapshots private (which you can do with an automation or my using our JIT access feature to go into the account) and then to track down and contact the individual using that IAM role. We have a lot of features to support both of those steps, but that’s fodder for future posts.
What’s great about this new view is that everything I need is right in one place. I don’t need to log into a SIEM, I don’t need to log into the account or check with a CSPM that’s running 15-60 minutes behind the real configuration, I don’t need to write any queries, and I didn’t have build my own scrips in a SOAR. All the key information is right in one place.
We are really excited for customers to try out these features that went live this week. Please send us any feedback or other information you think we should add to speed up your own incident handling!